
Saturday, December 26, 2009
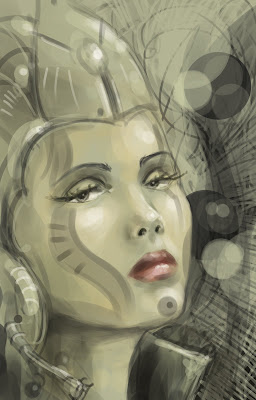
Quick sketch
I have a few sketches of ideas that I'm going to try and make some color comps for in Photoshop cs4, and some vector line work I really need to color. Been busy with the logo for my cousin still, I'll post some of the text in progress along with the most recent revision, as well as anything else I can find that I did this month but completely forgot to post. Hoping everyone's holiday was good, here's a quick sketch I did tonight, check back for more stuff in the next 2 days.
Saturday, December 5, 2009
The open house
This first image is what I'm wanting my painting's to resemble more of. The attempt to make a classical painting was fun, but maybe just not the style of work I feel like doing at this stage. Look for more stuff like this, I did this one at 3am on wed this week and it just worked out well imo. I didn't have enough time to do some more like this, or at least that I felt as happy with, but I'll be working on variations of this style for the next upcoming open house.
The display at the open house last night. Some crappy pictures of the ink washes, I'll scan them in when I get them back and switch out these pictures for some better.
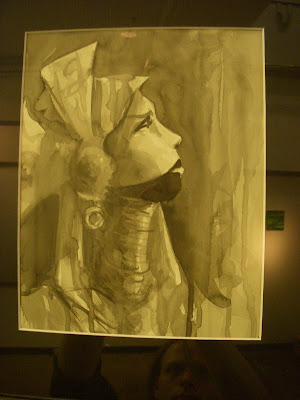
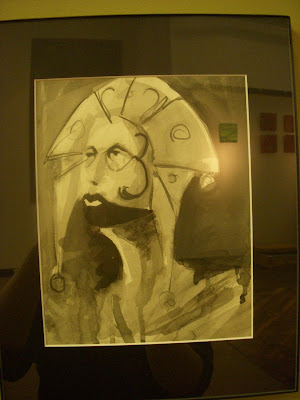


The display at the open house last night. Some crappy pictures of the ink washes, I'll scan them in when I get them back and switch out these pictures for some better.


final painting
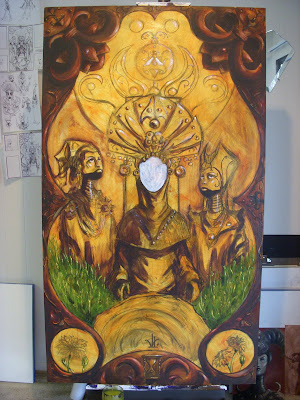
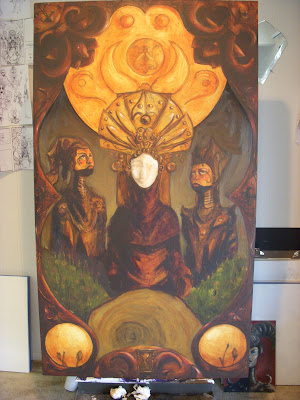
Got really bad about taking pictures and recording the process as this painting came out. There was definitely a point where I started painting by the seat of my pants, which isn't a horrible thing, but really doesn't help when your an inexperienced painter trying to get something done on time. I posted the last remaining pictures just for reference, but I think I won't be doing the rest of this series in this style. It feels to stiff, and just isn't the way I like to paint. I did some ink washes to put a lil more on the wall at the open house and I'm thinking one in particular is a good representation of what I'm wanting to do with these. I'll post that next.


Friday, November 27, 2009
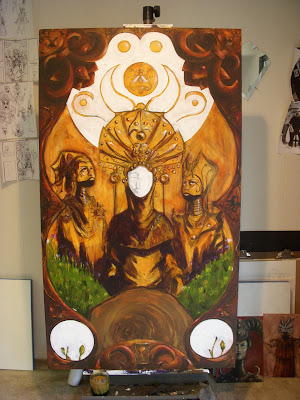
under painting ( so far)


I'm finding out through a few studies and this painting so far that I should probably leave the under painting a little more simple and transparent. I'm not at all dissatisfied with the painting so far, but I do wish the first wash of nickle azo gold was coming though a lil more on the border. I'll be knocking down the red on the border a lil more as I do the oil stage, evening it out a lil more to look more like a rusty metal rather than a liquorish color. Also going to add some characteristics like nicks and dings on the surface to look a lil more worn.
I try to work from dark to light more often just so I can judge my lights and highlights a little bit better, but I'll have to be careful not to make it to dark to recover from.
Wednesday, November 25, 2009
Final Drawing
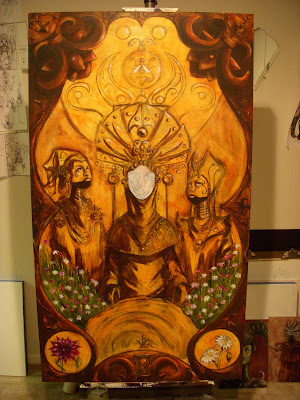
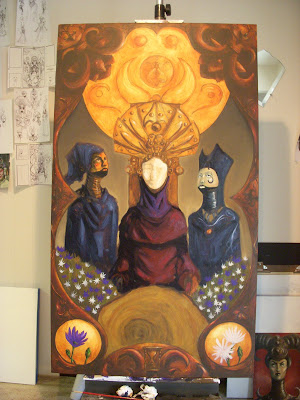
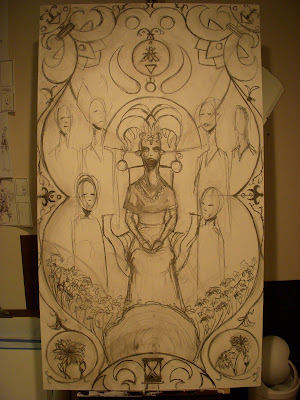
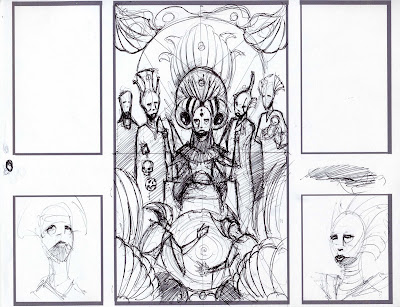
 The final drawing for the center painting. Decided on a few things while I was getting toward a final image: The main subject matter, the matriarch and two children, were increased in size and moved to be more prominent. Also removed the four other guest, as it was feeling a lil to cramped, plus they played no major roll, at least not in the center painting. They will more than likely be moved to one of the other paintings, as their purpose will be better suited there. I'm not completely ready to give the whole story here, as it is changing as the piece is completed. Some of the allegory and symbolism used can be pretty easy to understand, mainly the ones that are fairly obvious, the hour glass and bee emblem for instance. There is other information but there is no real way anyone else will see it until I start to develop a visual vocabulary with a series of these paintings. I'll try and post something more complete on whats going on here the night before it's shown.
After I get to a point where I'm happy with the drawing I seal it down first with spray matte finish, and then some type of gloss polymer medium like gloss varnish and medium from Liquitex. This gives me a smooth shiny surface that makes it easy for an acrylic wash to be applied. I put the matte spray finish on first to keep the vine charcoal or what ever drawing utensil you used from mixing with the gloss varnish medium. I'll post the next set of pictures with the acrylic wash and under painting as soon as that next step is done.
Thursday, November 19, 2009
Logo part duex
If you were curious why I haven't been updating as much lately, it's not due to a lack of work. Been doing work with Illustrator cs4 still, one of the things being the logo for my cousin, which I have some other test and samples but most are not worth showing because they never left the line work stage. This one did though, and I'll post the other color tests as I get them done, as well as the other Illustrator images I started last month but haven't had a chance to finish up in the midst of the other paintings I'm doing.


Crack the skye
Great album, really enjoying it for work music.
2nd sketch idea for the center image.
 Just more ideas on the matriarch's headdress and what the guests attire will look like.
 First start out with drawing half the design, making sure my lines are fairly clean and easy for me to trace. I keep a bunch of my sketches of ideas and such up next to my board for obvious reasons, this helps me focus on the things I liked from my previous ideas with out having to go search for a sketch when I remember something I liked about it.
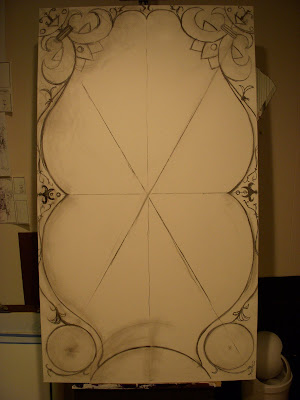
I then trace over my drawing onto tracing paper, using something like a layout pencil or something similar that is very dark and rubs off easy onto other surfaces. I then take that tracing, flip it, and match it up end to end with my original drawing and retrace it. This time following the path of my 1st tracing, I make sure that the graphite is actually being pressed and transferred onto the board making a mirror copy of my original drawing. I'm making this sound way more difficult than it is, it's just simply an image flip/transfer.
Here's the initial sketch. I'll have to refine this a lot more, adjusting as I go through the whole process, especially with the characters, most of these are just place holders until I get some reference. I usually do my first drawings and composition with out much reference, just to focus on how I want everything laid out. I'll then go and take pictures of things I'm having trouble with and want a more clear idea of how its set up and go from there. A lot of this is making the decision to leave somethings in favor of realism over fantasy and vice versa.
 Very basic sketch not much detail and still needs to be refined, but a lot of that is going to be done with the paint as the drawing I'm using just for the shapes and composition.

2nd sketch idea for the center image.
 Just more ideas on the matriarch's headdress and what the guests attire will look like.
 First start out with drawing half the design, making sure my lines are fairly clean and easy for me to trace. I keep a bunch of my sketches of ideas and such up next to my board for obvious reasons, this helps me focus on the things I liked from my previous ideas with out having to go search for a sketch when I remember something I liked about it.
I then trace over my drawing onto tracing paper, using something like a layout pencil or something similar that is very dark and rubs off easy onto other surfaces. I then take that tracing, flip it, and match it up end to end with my original drawing and retrace it. This time following the path of my 1st tracing, I make sure that the graphite is actually being pressed and transferred onto the board making a mirror copy of my original drawing. I'm making this sound way more difficult than it is, it's just simply an image flip/transfer.

Here's the initial sketch. I'll have to refine this a lot more, adjusting as I go through the whole process, especially with the characters, most of these are just place holders until I get some reference. I usually do my first drawings and composition with out much reference, just to focus on how I want everything laid out. I'll then go and take pictures of things I'm having trouble with and want a more clear idea of how its set up and go from there. A lot of this is making the decision to leave somethings in favor of realism over fantasy and vice versa.
 Very basic sketch not much detail and still needs to be refined, but a lot of that is going to be done with the paint as the drawing I'm using just for the shapes and composition.
Thursday, November 12, 2009
Cradling and prep for a painting surface ( oil )
Went to Lowes Tues and picked up most of the supplies I'll need to make the panels for the open house. My favorite thing about going to get my hardboard cut is the scrap pieces, always fun to think of what you can do with them, more paintings and such. Four of the 5 painting boards I'm making for the open house were scrap pieces, so never throw em away when they ask if you want the scraps, they come in handy, and your paying for em.
This month I'll be going through the whole painting process, from surface construction to finished painting, to help those who want to know how to do it, and for those who are just curious what goes into making your surface from about as close to scratch as you can get with out growing the trees yourself.
 Here you have a sheet of hardboard, it's also called Masonite, but that's the brand name not the product, the actual wood being called hardboard. Then the board you use to cradle with is poplar, I prefer this over pine, from what I've been told pine has a greater chance of warping over time.
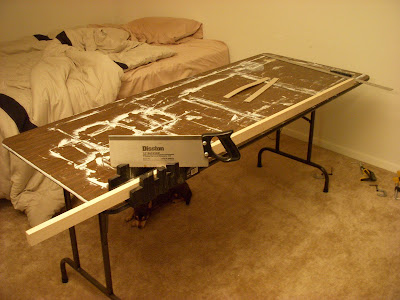
 Cut the size you need to go around the inside area of the hardboard from the poplar, making a 45 degree angle cut on both ends. The longest end of the cut, where it tapers off, should be the length of your board. So if your board is 16x20, cut your poplar to 16 and 20 inch cuts, don't over compensate for the outside edge, because these are cradling the hardboard, not framing it.
 Using wood glue and vice grips ( and if your cheap like me weights cause you didn't have enough vice grips) set the poplar pieces to the edge of the hard board, making the two woods flush with one another to make a smooth edge. This should set for at least 30min, or even longer if you want to make sure you have a tight fit. Don't stress newly glued joints for 24hrs after gluing.
 Your corners should look like this if you did the 45 degree angle. You can also elbow joint it if you want, not sure if either is better structural makeup, I just prefer the look of the 45 degree angle fit.
 Just continue to glue the poplar down to the edge of the board to make a flat edge, try your best to get no hang over of the poplar or hardboard.
 The finished cradle with a cross bar. Right now time and money wont permit, but I think from now on just for looks and better structure I'm going to start putting in corner bars too. People may never see this side of your painting, but it's still important to me to have good craftsmanship and aesthetics. This is only my 2nd cradled board so there's always room for improvement, corner bars next time!
 Now we begin prepping the board. First thing, tape off the edge of your cradle to protect from the dripping of all the paint, polymer, and materials you'll be using. This will give you a nice clean edge on your board.
 Now apply GAC 100 from golden. This helps keep the hardboard from damaging the paint after your finished. A lot of hardboard comes tempered with chemicals that can eventually damage and seep into your painting over time, causing discoloring. I do two coats to make sure the surface is well and sealed.
 Now go back in with another polymer medium to seal off the edges of the tape more, here I'm using regular gel gloss from Golden. This will help do the same thing the tape will do, but in my experience I've had oil washes seep down between the cradle and tape, so here I do this to help protect against thin downed materials that will sometimes breach the tape.
 Finally we get to gesso the board. Here I apply 3 to 4 coats to cover up and color of the hardboard and to make a solid surface barrier between the board and the paint. This will help with adhesion of the paint and a more archival surface for the paint to rest on.

Should have enough coats of gesso so that areas like these don't show any of the hardboard underneath. Go for completely white.
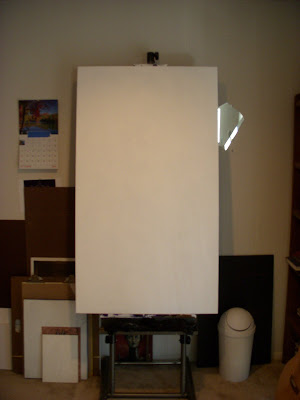
Board finished and ready to paint on. I'll add my steps of painting as I get this guy done over the next 3 weeks. Peace.
This month I'll be going through the whole painting process, from surface construction to finished painting, to help those who want to know how to do it, and for those who are just curious what goes into making your surface from about as close to scratch as you can get with out growing the trees yourself.
 Here you have a sheet of hardboard, it's also called Masonite, but that's the brand name not the product, the actual wood being called hardboard. Then the board you use to cradle with is poplar, I prefer this over pine, from what I've been told pine has a greater chance of warping over time.
 Cut the size you need to go around the inside area of the hardboard from the poplar, making a 45 degree angle cut on both ends. The longest end of the cut, where it tapers off, should be the length of your board. So if your board is 16x20, cut your poplar to 16 and 20 inch cuts, don't over compensate for the outside edge, because these are cradling the hardboard, not framing it.
 Using wood glue and vice grips ( and if your cheap like me weights cause you didn't have enough vice grips) set the poplar pieces to the edge of the hard board, making the two woods flush with one another to make a smooth edge. This should set for at least 30min, or even longer if you want to make sure you have a tight fit. Don't stress newly glued joints for 24hrs after gluing.
 Your corners should look like this if you did the 45 degree angle. You can also elbow joint it if you want, not sure if either is better structural makeup, I just prefer the look of the 45 degree angle fit.
 Just continue to glue the poplar down to the edge of the board to make a flat edge, try your best to get no hang over of the poplar or hardboard.
 The finished cradle with a cross bar. Right now time and money wont permit, but I think from now on just for looks and better structure I'm going to start putting in corner bars too. People may never see this side of your painting, but it's still important to me to have good craftsmanship and aesthetics. This is only my 2nd cradled board so there's always room for improvement, corner bars next time!
 Now we begin prepping the board. First thing, tape off the edge of your cradle to protect from the dripping of all the paint, polymer, and materials you'll be using. This will give you a nice clean edge on your board.
 Now apply GAC 100 from golden. This helps keep the hardboard from damaging the paint after your finished. A lot of hardboard comes tempered with chemicals that can eventually damage and seep into your painting over time, causing discoloring. I do two coats to make sure the surface is well and sealed.
 Now go back in with another polymer medium to seal off the edges of the tape more, here I'm using regular gel gloss from Golden. This will help do the same thing the tape will do, but in my experience I've had oil washes seep down between the cradle and tape, so here I do this to help protect against thin downed materials that will sometimes breach the tape.
 Finally we get to gesso the board. Here I apply 3 to 4 coats to cover up and color of the hardboard and to make a solid surface barrier between the board and the paint. This will help with adhesion of the paint and a more archival surface for the paint to rest on.
Should have enough coats of gesso so that areas like these don't show any of the hardboard underneath. Go for completely white.

Board finished and ready to paint on. I'll add my steps of painting as I get this guy done over the next 3 weeks. Peace.
Tuesday, November 10, 2009
More sketchy mc sketcherson
Going to be adding a lot of sketches this month for the 5 piece painting I'm doing for the Wheeler open house in dec. I'll try and add some of the other things I'm working on, still got the logo in the works, and I'll post what I've done with hat lately later tonight. Gonna be fairly busy with the open house I think, so I probably wont get to updating my website anymore until next month, when I'll have more time to work on the more commercial pieces I started last month all done in vector illustration.
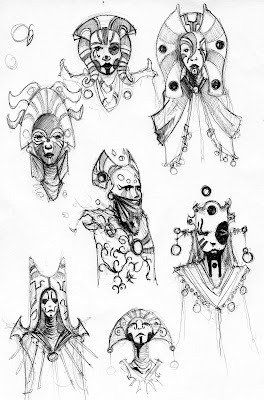
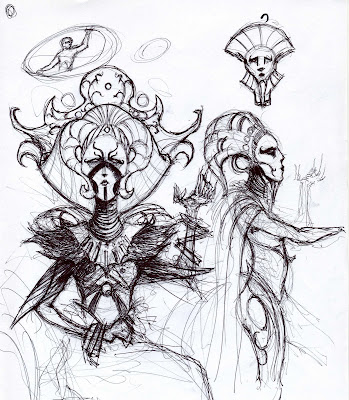 This was one of the earliest sketches I had of the matriarch when I first thought of the image. Not really what I'm going for, but this was the start, and figured it'd be worth it to show more of my process than what I usually do. For the most part drawings like these would never see the light of day, considering the final product is usually fairly different.
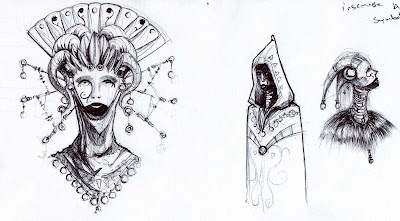
 These two head pieces are more of what I've been going for. As for the facial paint I've decided to stick with the dark colored bottom half of the jaw with the bottom lip a light color for contrast. This with be constant through all masks to make them all uniform, while other face paint will differ to give more character and fill out the costume more.
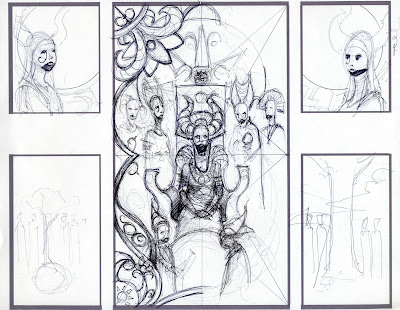
First initial sketch for the five paintings. I'll be finalizing the center image first and starting on it first since it's the largest. The others I'll be working out soon and I'll share those then, at that time I'll give you a better idea of what I'm going for and the narrative behind this.
 This was one of the earliest sketches I had of the matriarch when I first thought of the image. Not really what I'm going for, but this was the start, and figured it'd be worth it to show more of my process than what I usually do. For the most part drawings like these would never see the light of day, considering the final product is usually fairly different.
 These two head pieces are more of what I've been going for. As for the facial paint I've decided to stick with the dark colored bottom half of the jaw with the bottom lip a light color for contrast. This with be constant through all masks to make them all uniform, while other face paint will differ to give more character and fill out the costume more.
First initial sketch for the five paintings. I'll be finalizing the center image first and starting on it first since it's the largest. The others I'll be working out soon and I'll share those then, at that time I'll give you a better idea of what I'm going for and the narrative behind this.
Sunday, November 8, 2009
Early paint test
Here's one of the test paintings I have going for the series I'm working on. I figure I'll work on as many of these for the next week then construct the cradles for the boards so I have almost 3 weeks to work on the main five paintings. For this first set of tests I used no reference or sketches, just went straight on working more with the materials than anything else. Also trying to hone in on a color palette I can be happy with. Don't know if I'll do anything more to this but will post if I do. If anything I can see going in and repainting the face from some reference. The eyes are way to small and features like the cheeks are over done.
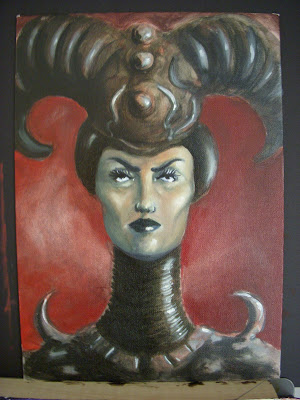
The image on the left is still in progress and is being done with an acrylic wash and local color pass to give it a solid base to work off of, after which I'll go into it with oils and thicker paint. The image on the right is just oil paint with nothing added to it other than mineral spirits to thin down for washes. This is my first attempt in a long time at oils and I'm ok with the result, although I'm gonna have to work hard to get to the point where I'm going to be happy with the final five, so we'll have to wait and see. The medium itself is great, and I'm excited to start doing more of this to balance out the digital stuff, long hours in front of the easel are much easier than long hours in front of the computer.
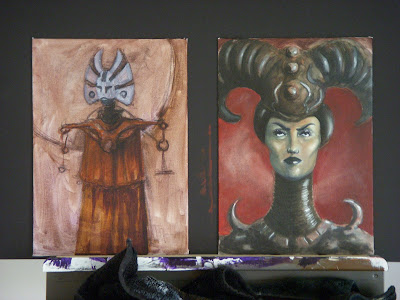
Another pic to give a sense of scale. Really not that big, considering the main image of the 5 paintings I'm doing is 32x56, these are both just 10x14.

new sketches for paintings
Sketches for paintings I'm working on for the upcoming open house at the Wheeler Dec. 4. Exploring more ideas in masks and other weird looking things, should be five paintings. I'll post the sketches and layout once I get to it this week, these drawings here are just trying out different ideas for the Matriarch's head piece. I'm hoping to start doing more traditional work to show around town, don't really ever do shows but I'm looking to change that.
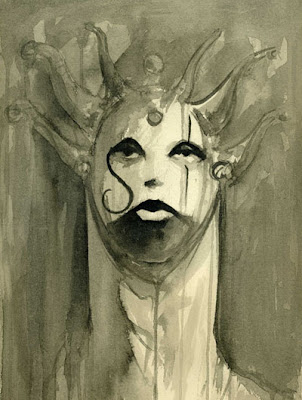
These are a little to clownish for me, although I'm happy with some of the shapes, I think some of the paint could be changed up a bit.
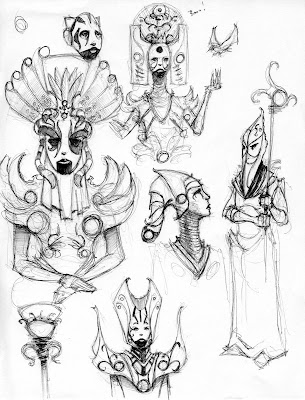
I'm happier with the out come of these, more along the lines of whats in my head. I've been working on two minor paintings and hopefully a few more this week if time permits to beef up on my traditional painting since I haven't done it in so long, with the exception of Art vs Art. I'll post those when I get them to a state that I feel like sharing.
Subscribe to:
Posts (Atom)
